
Despite its small size and affordability, the Raspberry PI has limitless functions.
From controlling robots to playing games, you can do all sorts of applications with this fantastic gadget.
But today, we’ll explore how to watch Netflix on Raspberry PI.
Sadly, getting Netflix up and running on a Raspberry PI is tricky.
You’d need much tweaking as the streaming giant relies on Digital Rights Management (DRM). Nevertheless, we’re here to guide you through the process.
This article will teach you how to work around the difficulties, stream your favorite Netflix movies on your Raspberry PI, and more.
Table of Contents
- How To Add Netflix on a Raspberry PI
- Equipment Needed
- Steps to Add Netflix to Your Raspberry PI
- Rounding Up
How To Add Netflix on a Raspberry PI

Raspberry PI connected to a PC
In short, you can install Netflix in two ways. First, you can use a plug-in for Kodi (the famous media center). Second, you can access Netflix through Chromium, but you’ll need a Widewine DRM package.
The best way to enjoy Netflix on your PI board is using the Kodi plug-in. And it takes many steps because the software must get an updated DRM library version to allow streaming.
Alternatively, you can opt for operating systems featuring the Kodi package, like OSMC. But it will only work if you have terminal access.
Let’s get into what you need for this project.
Note: We’ll be using Raspbian OS for this tutorial.
Equipment Needed
The components needed to make this project work include the following:
- Raspberry PI (2 and above)
- Power supply
- Ethernet cable or Wi-Fi connection
- USB keyboard and mouse
- HDMI cable
- Micro SD card (we recommend 16GB or more)
Note: You can spice things up by adding a Raspberry PI case.
Steps to Add Netflix to Your Raspberry PI
Prepare the Raspberry PI
First, you must ensure everything is in order before getting Netflix to work. Then, proceed to update all packages added to your PI. While at it, run the following commands to perform this step.
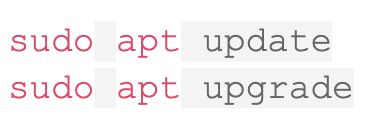
After updating your package, add Kodi to your Raspberry PI. You can skip to the next step if you have a distribution (like OSMC). If you don’t, use the following commands to install Kod:

Note: We’re using Kodi because it’s more reliable than a web browser. Also, the Chromium method will likely fail and require extra effort to run and maintain.
Once the Kodi installation is successful, you can include some additional packages. The packages will ensure the Kodi software runs smoothly. Use the following code to proceed.

Next, set up the Python packages Kodi’s Netflix plug-in needs. You can do this through the pip package manager with the following commands.

Lastly, download the CastagnalT repository to allow the Netflix plug-in installation and activate automatic updates. Next, get the latest version with the following command.

Add the Netflix Repository on Kodi
Now, let’s look at how to use all the packages installed in the first section. Begin by launching Kodi. You can do this by navigating to the start menu icon and hovering over “Sound & Video.” Then, click “Kodi.”
Next, tweak the Kodi settings and allow installation from unknown sources. You can do this by looking for the “gear” symbol, usually at the sidebar’s top. When a new page appears, select “System” and move to “Add-ons” on the sidebar.
Next, activate the toggle for “Unknown Sources.” Although you’ll see some warning messages, ignore them if you installed the plug-ins from trustworthy sources.
After activating the “Unknown sources” option, go back to the main settings page and select “Add-ons” on the menu button. Next, select “Install from zip file” to install the CastagnalIT repository.
Install the Netflix Plug-in
We can now install the Netflix plug-in through Kodi. First, navigate to “Add-ons” and move to “install from repository.” Then, on the menu, search for ” CastagnaIT Repository” and click to open.
Next, locate the Netflix plug-in by opening the “Video add-ons” section. Click on “Netflix” and start the process. Before the installation begins, the software will ask if it can install some extra plug-ins. Then, click “Ok.”
Before you open the Netflix app after installing it, activate the “Adaptive Inputstream” plug-in.
You can do this by navigating to the “My Add-ons” page and clicking “VideoPlayer Inputstream.” After, select the “InputStream Adaptive” option and click enable.
Running Netflix on Your Raspberry PI
Head back to the main menu and choose “Add-ons” again. You’ll see Netflix on the page, so click it to open.
On your first launch, the Kodi Netflix add-on will ask you to choose a login method. The easiest one of the two options is “Email/Password.” Once you’ve logged in successfully, pick a show to stream.
Since its first launch, the plug-in will run the necessary processes to install the required DRM modules. Hence, when you see a notification named “Widevine CDM is required,” click “Install Widevine” to initiate the process.
Note: You must have at least 3.1GB free to install Widevine CDM.
Then, accept a EULA from Google to allow your PI to obtain the required files for the Netflix plug-in. Also, click “I Accept” on the next pop-up box and wait for the process to finish.
Note: It will take some time, so don’t panic if it appears stuck.
After the process, your Netflix plug-in will activate, allowing you to stream any of your favorite movies.
Logging in with Netflix Authentication Key
If the first login option doesn’t work, you can use the second as an alternative. However, logging in with an authentication key is more challenging than inputting your email and password.
Getting the Authentication Key
You can get the authentication key if you have a Chromium-based web browser. Install with the following code:

Next, install Python, its pip package manager, and some extra add-ons. Use the following commands:

Then, install the Python packages you need to run the script for generating the Netflix authentication key with the following commands:

Lastly, download the remaining Python script from the previously installed CastagnaIT repository with the following code:

After downloading the script, run it with this command. Hence, it will search for chrome and run it automatically.

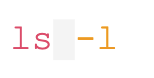
Then, follow the prompts in your terminal to create your authentication file. Consequently, you’ll see a file named “NFAuthentication.key” inside the same directory with your script.
Or you can use the following command to find it easily:
If you generated your authentication key on another device, you can open the file with a text editor and copy its contents over SSH to a new file on your Kodi device. Use the following command:
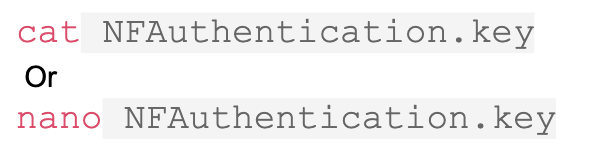
Note: Remember to save the file with CTRL+X+Y and ENTER.
Accessing Netflix with the Key
Launch Kodi and move to the Netflix add-on. It should provide two login options; Email/Password or Authentication key.
Choose the “Authentication key” option to proceed. In the next dialog box, search for where you stored your Netflix authentication key file and click enter.
Then, it will ask for a generated pin. You can use the keypad provided on the screen to input your pin and click enter. Lastly, enter your account password to allow the add-on to use the authentication key.
Afterward, Netflix should log in successfully and allow you to stream your favorite movies.
Rounding Up
Raspberry PI is an incredibly versatile device. You can use the board to do almost anything, from learning programming to building a personal computer. One of the many applications you can try with a PI board is transforming it into a media center.
With some steps and tweaking, you can plug your Raspberry PI into your TV and watch some shows on Netflix.
Do you have any questions on this topic? Feel free to reach us, and we’ll be happy to help.